(Compatible article number 26188)
How can I set up my Ovala 2K QHD Webcam?
The Ovala 2K QHD Webcam is designed for video conferencing, remote working, online learning, streaming and everyday communication. The webcam captures high-quality video and includes an integrated microphone for clear voice communication.
The webcam can be connected directly to a compatible computer using the integrated USB cable. Once connected, most operating systems automatically detect the webcam and prepare it for use.
Follow the steps below to connect, position and configure the webcam for the best possible user experience.
The available functions may depend on the operating system and communication application being used.
-------------------------------------------------------------------------------------------------------------------------------------------------
Connect the webcam
Follow the steps below to connect the webcam to a compatible computer.
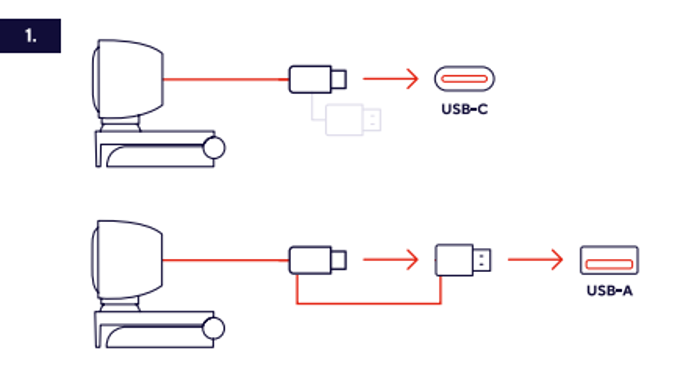
Connect using USB
- Locate an available USB port on the computer or laptop.
- Connect the integrated USB connector of the webcam directly to the USB port.
- Ensure that the connector is fully inserted to provide a stable connection.
- Wait for the operating system to detect the webcam and automatically install the required components.
- A notification may appear indicating that the webcam is being configured and prepared for use.
- Allow the installation process to complete before opening communication applications.
- The webcam is connected and ready to be selected within compatible applications.
ℹ️ The webcam is recognised automatically by most modern operating systems and normally does not require driver installation.
If the webcam is not detected automatically, reconnect the USB connector or try another USB port.
-------------------------------------------------------------------------------------------------------------------------------------------------
Position the webcam
Correct positioning helps achieve optimal image quality and a professional appearance during video calls and meetings.
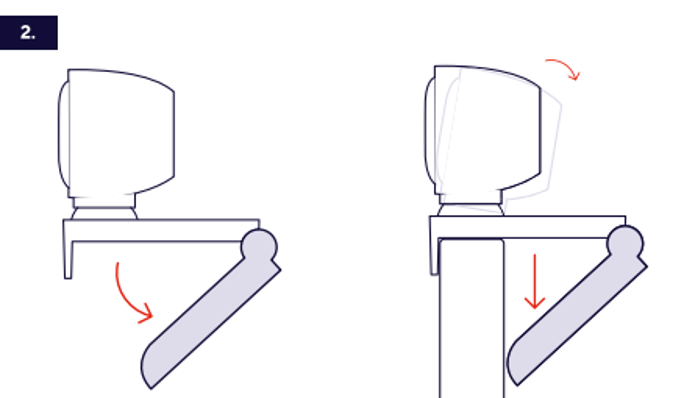
- Place the webcam on top of the monitor or laptop display using the integrated mounting clip.
- Ensure that the mounting clip is stable and securely attached.
- Adjust the webcam so that it faces directly toward the user.
- Position the webcam at approximately eye level for a more natural viewing angle.
- Open a camera preview and verify that your face is centred within the image.
- Fine-tune the angle where necessary until the desired framing has been achieved.
- Ensure that adequate lighting is available in front of the user for the best video quality.
ℹ️ Position the webcam at eye level for the most natural video appearance.
-------------------------------------------------------------------------------------------------------------------------------------------------
Select the webcam in your application
The webcam can be used with Microsoft Teams, Zoom, Google Meet, Skype and other communication applications.
- Open the communication application.
- Navigate to the application's settings menu.
- Open the camera, video or devices settings section.
- Select Trust Ovala 2K QHD Webcam from the list of available cameras.
- Verify that a live preview image is displayed.
- Perform a test call if the application provides this feature.
- Save the settings and begin using the webcam.
The names of menus and settings may vary depending on the application being used.
-------------------------------------------------------------------------------------------------------------------------------------------------
Features and controls
The Ovala webcam includes multiple features that assist with communication, privacy and daily use.
Camera lens
The camera lens captures video in 2K QHD resolution and provides detailed image quality suitable for professional and personal communication.
Integrated microphone
The integrated microphone captures voice during calls and meetings without requiring an external microphone.
Mounting clip
The mounting clip allows the webcam to be positioned securely on monitors and laptop screens.
Privacy cover
The integrated privacy cover allows the camera lens to be physically covered whenever video functionality is not required.
Using the privacy cover provides an additional level of privacy and helps prevent unwanted image capture while the webcam is not being used.
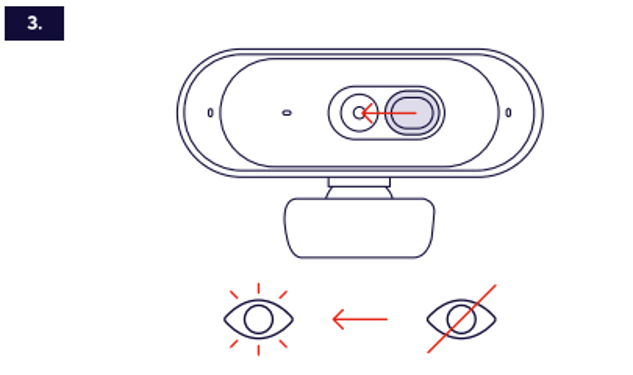
- Locate the privacy cover on the webcam.
- Move the privacy cover to the closed position when video is no longer required.
- Verify that the camera lens is fully covered.
- Before starting a video call, move the privacy cover back to the open position.
- Confirm that the camera image is visible in the application preview window.
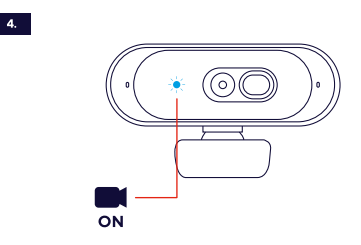
Webcam LED Indicator
- LED ON: The LED lights up when the webcam is actively being used.
- LED OFF: The LED turns off when the webcam is not actively being used.
ℹ️ Close the privacy cover whenever the webcam is not being used.
If no image appears during a video call, verify that the privacy cover is fully open.
-------------------------------------------------------------------------------------------------------------------------------------------------
Usage recommendations
- Use the webcam in a well-lit environment.
- Avoid strong light sources directly behind the user.
- Position the webcam at eye level whenever possible.
- Clean the camera lens regularly using a soft dry cloth.
- Verify camera and microphone operation before important meetings.
- Close applications that are not actively using the camera.
- Use the privacy cover whenever the webcam is not actively required.
ℹ️ Proper lighting and camera positioning significantly improve image quality during video calls.
-------------------------------------------------------------------------------------------------------------------------------------------------
Troubleshooting
The webcam is not detected
- Reconnect the USB connector.
- Try another USB port.
- Restart the computer.
- Verify that the webcam appears in the operating system device list.
- Check for available operating system updates.
- Test the webcam in another application.
No image is displayed
- Verify that the webcam is selected as the active camera device.
- Check camera permissions within the operating system.
- Ensure the privacy cover is fully open.
- Close other applications that may be using the camera.
- Reconnect the webcam.
- Restart the communication application.
Poor image quality
- Clean the camera lens.
- Improve ambient lighting.
- Avoid strong backlighting.
- Adjust the webcam position.
- Verify that the application uses the highest available video quality.
Microphone is not working
- Verify that the webcam microphone is selected as the audio input device.
- Check microphone permissions.
- Verify microphone volume settings.
- Reconnect the webcam.
- Perform a microphone test within the communication application.
-------------------------------------------------------------------------------------------------------------------------------------------------
Notes:
ℹ️ The available functions may depend on the connected operating system and communication software being used.
The webcam is connected and ready for installation when it has been detected by the operating system.
For additional information and frequently asked questions, visit www.trust.com/26188/FAQ.
Was this article helpful?
That’s Great!
Thank you for your feedback
Sorry! We couldn't be helpful
Thank you for your feedback
Feedback sent
We appreciate your effort and will try to fix the article