(Compatible article number 26528)
How can I set up my GXT 1409 Vexa Dual Wireless Gaming Earphones?
Before using the Vexa gaming earphones for the first time, fully charge the built-in batteries of the earphones and the charging case.
The Vexa can be connected wirelessly to a compatible device using Bluetooth®. The included USB-C receiver can be used as an alternative wireless connection.
Charge the earphones and charging case before using the product for the first time.-------------------------------------------------------------------------------------------------------------------------------------------------
Charge or recharge the earphones
Place the left and right earphones in the charging case to charge their built-in batteries.
Make sure that each earphone is positioned correctly in its designated compartment in the charging case.
Charging the earphones takes approximately 1 hour.
Charge the charging case
- Connect the USB-C connector of the charging cable to the USB-C charging port of the charging case.
- Connect the USB-A connector to a suitable USB-A power source.
- Leave the charging case connected while it is charging.
- A complete charge of the charging case takes approximately 1.5 hours.
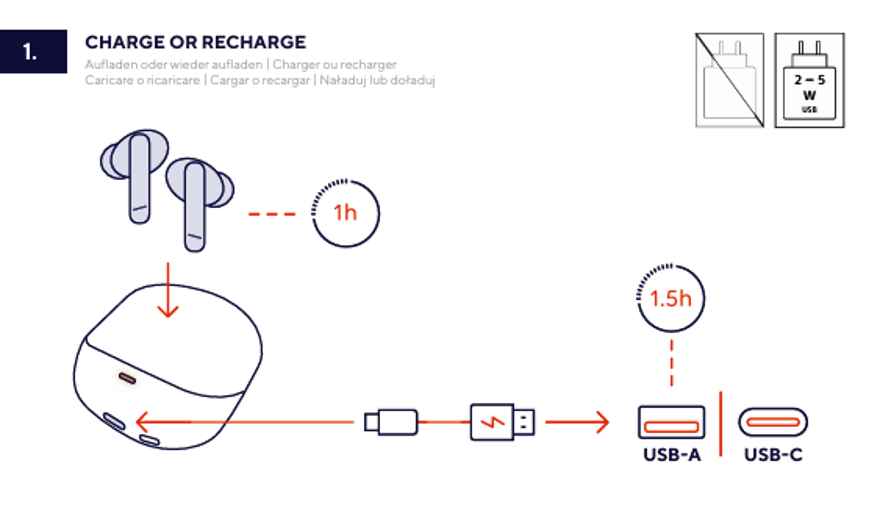
ℹ️ The charging case can recharge the earphones approximately 2 to 5 times before the charging case itself needs to be recharged.Use the USB-A-to-USB-C charging connection shown in the user guide.-------------------------------------------------------------------------------------------------------------------------------------------------
Wireless connection options
The Vexa supports two wireless connection methods:
- A Bluetooth® connection to a compatible Bluetooth device.
- A wireless connection using the included USB-C receiver.
Use the connection method that is compatible with the device on which you want to use the earphones.
-------------------------------------------------------------------------------------------------------------------------------------------------
Connect via Bluetooth®
The Vexa can be connected to a compatible computer, tablet, smartphone, or other Bluetooth device.
The earphones are displayed as Vexa in the Bluetooth settings of the device.
- Remove both earphones from the charging case.
- The earphones will switch on and prepare for a wireless connection.
- Open the Bluetooth settings on the computer, tablet, smartphone, or other compatible device.
- Make sure Bluetooth is enabled on the device.
- Select Vexa from the list of available Bluetooth devices.
- Wait until the Bluetooth connection has been established.
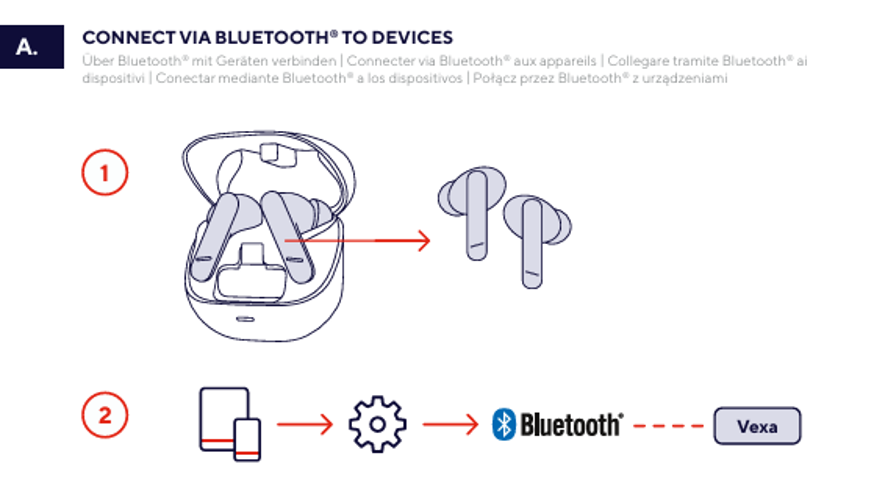
ℹ️ The earphones appear as “Vexa” in the Bluetooth settings of the connected device.The availability and behaviour of Bluetooth functions may depend on the connected device.-------------------------------------------------------------------------------------------------------------------------------------------------
Connect using the USB-C receiver
Use the included USB-C receiver to connect the Vexa wirelessly to a compatible device with a USB-C port.
- Locate an available USB-C port on the device.
- Insert the USB-C receiver into the USB-C port.
- Remove both earphones from the charging case.
- Wait until the wireless connection has been established.
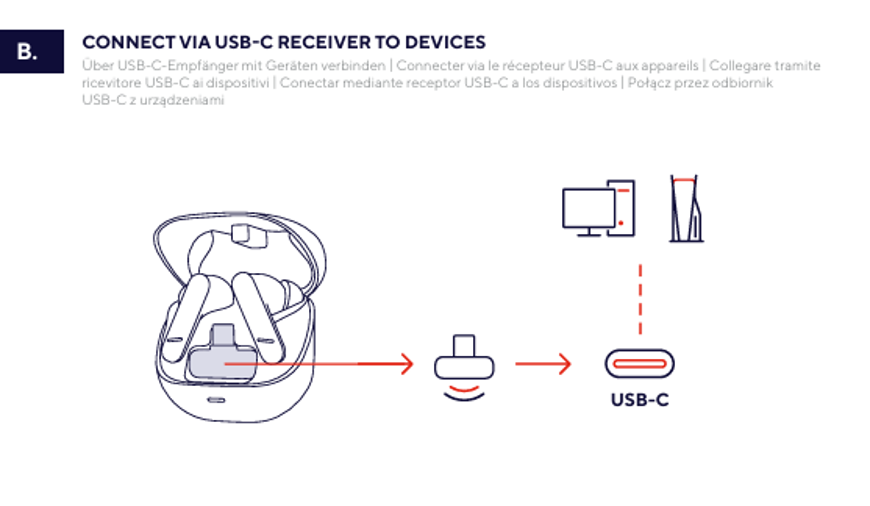
ℹ️ The USB-C receiver provides an alternative to the Bluetooth® connection.Connect the receiver directly to a compatible USB-C port.-------------------------------------------------------------------------------------------------------------------------------------------------
Touch controls
Use the touch-sensitive surfaces on the left and right earphones to control playback, calls, volume, operating modes, and the microphone.
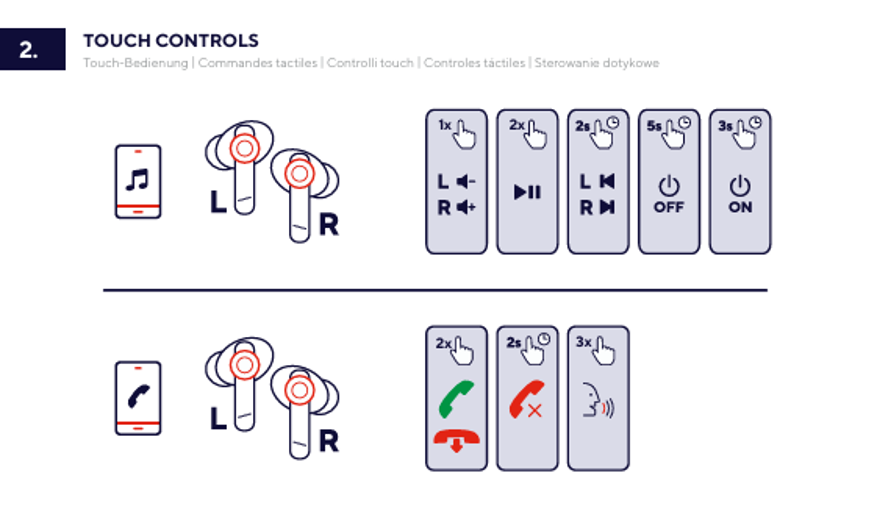
Play or pause audio
Tap the touch control once to play or pause the current audio.
Go to the previous track
Tap the left earphone twice to return to the previous track.
Go to the next track
Tap the right earphone twice to go to the next track.
Decrease the volume
Press and hold the touch control on the left earphone to decrease the volume.
Increase the volume
Press and hold the touch control on the right earphone to increase the volume.
Switch between available modes
Tap the touch control three times to switch between the available operating modes.
Switch the earphones on
Press and hold the touch control for approximately 2 seconds to switch the earphone on.
Switch the earphones off
Press and hold the touch control for approximately 5 seconds to switch the earphone off.
The left and right touch controls can perform different functions. Use the side indicated in the user guide.-------------------------------------------------------------------------------------------------------------------------------------------------
Call controls
Use the touch controls on the earphones to manage supported calls.
Answer or end a call
Tap the touch control twice to answer an incoming call or end the current call.
Reject an incoming call
Press and hold the touch control for approximately 2 seconds to reject an incoming call.
ℹ️ The availability of call controls may depend on the connected device and the application being used.-------------------------------------------------------------------------------------------------------------------------------------------------
Microphone control
The touch controls can be used to mute or unmute the microphone during a supported call or communication session.
- Use the microphone touch command indicated in the user guide to mute the microphone.
- Repeat the touch command to unmute the microphone.
Check the microphone status in the connected application before speaking.-------------------------------------------------------------------------------------------------------------------------------------------------
Troubleshooting
The earphones do not switch on
- Place both earphones in the charging case and allow them to charge.
- Charge the charging case using the USB-A-to-USB-C cable.
- Press and hold the touch control for approximately 2 seconds.
Vexa does not appear in the Bluetooth device list
- Make sure Bluetooth is enabled on the device.
- Place both earphones in the charging case and remove them again.
- Search for Vexa again in the Bluetooth settings.
- Move the earphones closer to the device during pairing.
The USB-C receiver connection does not work
- Check that the USB-C receiver is fully inserted into the USB-C port.
- Connect the receiver to another compatible USB-C port.
- Remove both earphones from the charging case and wait for the connection.
Only one earphone produces sound
- Place both earphones back in the charging case.
- Make sure both earphones are charged.
- Remove both earphones from the charging case at the same time.
- Reconnect the earphones to the device.
The touch controls do not respond
- Tap the touch-sensitive area shown in the user guide.
- Make sure the earphones are switched on and connected.
- Place the earphones in the charging case and remove them again.
The microphone does not transmit sound
- Check whether the microphone is muted.
- Use the touch control to unmute the microphone.
- Check the microphone settings of the connected device or application.
The volume is too low or too high
- Use the touch control on the left earphone to decrease the volume.
- Use the touch control on the right earphone to increase the volume.
- Adjust the volume on the connected device if required.
-------------------------------------------------------------------------------------------------------------------------------------------------
Notes:
ℹ️ The availability and behaviour of the touch, playback, microphone, and call functions may depend on the connected device and application.Store the earphones in the charging case when they are not being used.
Keep the USB-C receiver in a safe location when it is not being used.
Was this article helpful?
That’s Great!
Thank you for your feedback
Sorry! We couldn't be helpful
Thank you for your feedback
Feedback sent
We appreciate your effort and will try to fix the article