(Compatible article numbers 26402 / 26403)
How can I set up my Ferro Rechargeable Multi-Wireless Hyperscroll Mouse?
Before using the mouse for the first time, it is recommended to fully charge the internal battery. The Ferro mouse supports connection using either the included 2.4 GHz USB receiver or Bluetooth.
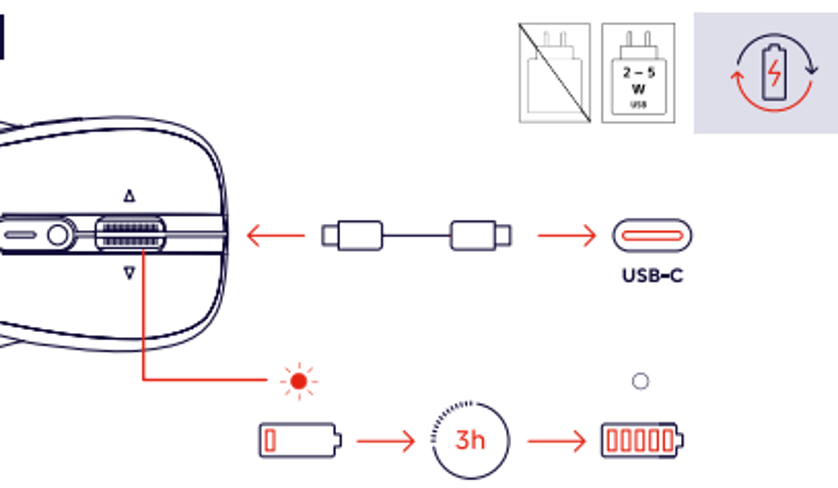
Charging the Mouse
Connect the supplied USB-C charging cable to the charging port located at the front of the mouse.
- Connect the USB-C cable to the mouse.
- Connect the other end to a USB port on a computer or a USB charger.
- A charging power of 2–5 W is recommended.
- Allow approximately 3 hours for a full charge.
During charging, the battery indicator illuminate. When charging is complete, the indicator turns off.
---------------------------------------------------------------------------------------------------------------------------------------------
Mouse Controls Overview
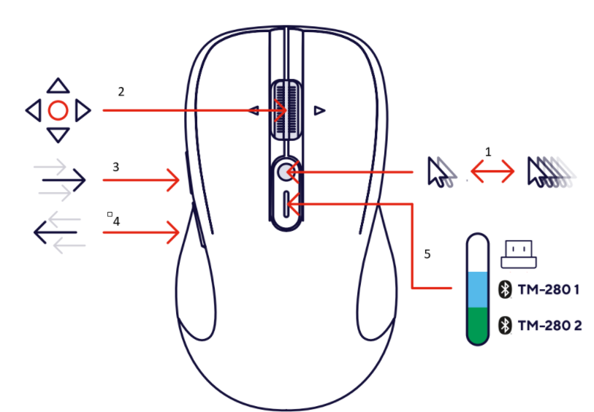
1. DPI Button
The small round button located directly underneath the scroll wheel adjusts the mouse sensitivity (DPI).
- Press repeatedly to cycle through the available DPI levels.
- Higher DPI results in faster cursor movement.
- Lower DPI provides more precise cursor control.
2. HyperScroll Wheel
The wheel located between the left and right mouse buttons performs multiple functions.
- Scroll vertically through webpages and documents.
- Supports horizontal scrolling in compatible applications.
- Press the wheel for a middle-click function.
3. Forward Button
The upper side button located on the left side of the mouse.
- Browser Forward.
- Next page in supported software.
4. Back Button
The lower side button located on the left side of the mouse.
- Browser Back.
- Previous page in supported software.
5. Operating Mode Selector
The operating mode selector allows switching between different wireless connection methods.
- TM-2801 – Bluetooth Device 1.
- TM-2802 – Bluetooth Device 2.
- USB Receiver – 2.4 GHz wireless connection.
This allows the mouse to remain paired to multiple devices and switch quickly between them.
---------------------------------------------------------------------------------------------------------------------------------------------
Connecting Using the USB Receiver (2.4 GHz Wireless)
The Ferro mouse includes a USB receiver which provides a stable wireless connection.
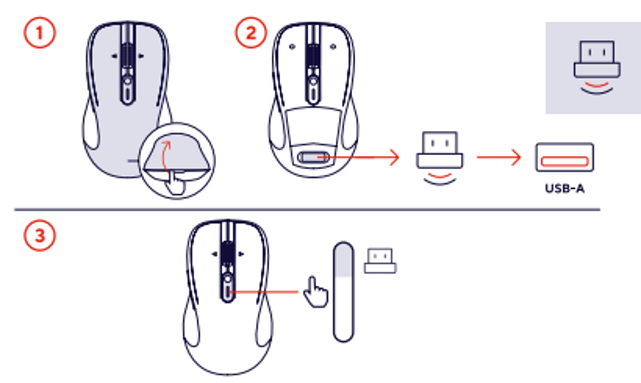
- Open the top cover and remove the USB receiver from the storage compartment inside the mouse.
- Insert the USB receiver into an available USB-A port.
- Turn the mouse on using the ON/OFF switch located on the bottom.
- Select USB Receiver mode using the operating mode selector.
The connection should be established automatically without requiring additional drivers.
Power Switch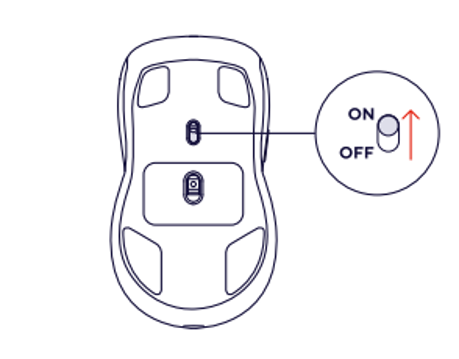
The power switch is located on the underside of the mouse.
- Slide to ON to power the mouse.
- Slide to OFF when transporting or storing the mouse to conserve battery life.
---------------------------------------------------------------------------------------------------------------------------------------------
Connecting Using Bluetooth
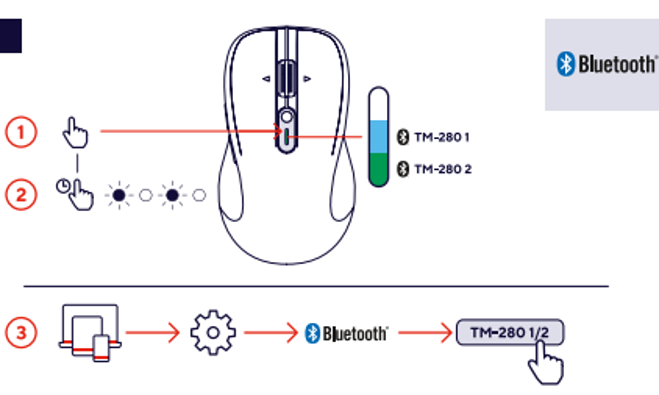
The mouse supports two separate Bluetooth profiles, allowing quick switching between multiple devices.
- Select TM-280 1 or TM-280 2 using the operating mode selector.
- Press mode selector button the indicator starts flashing.
- Open Bluetooth settings on your computer.
- Select TM-280 1 or TM-280 2 from the list of available devices.
- Wait for the pairing process to complete.
---------------------------------------------------------------------------------------------------------------------------------------------
Battery Status Indicator
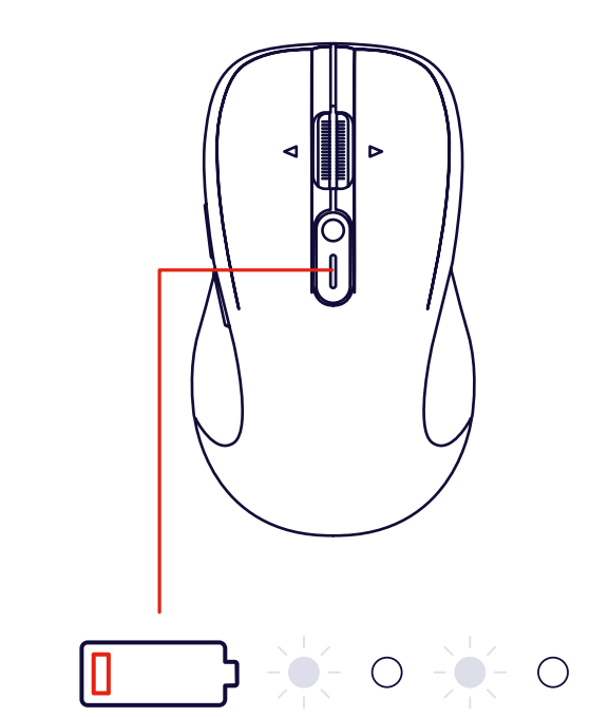
The LED indicator located on the top of the mouse displays battery and charging status.
- LED flashing: Battery level is low and should be recharged.
For the best battery performance, fully charge the mouse before first use and turn it off when not in use for extended periods.
Always ensure that the selected operating mode matches the connection method currently being used. If the mouse does not respond, confirm that the correct Bluetooth profile or USB receiver mode is selected.
Was this article helpful?
That’s Great!
Thank you for your feedback
Sorry! We couldn't be helpful
Thank you for your feedback
Feedback sent
We appreciate your effort and will try to fix the article